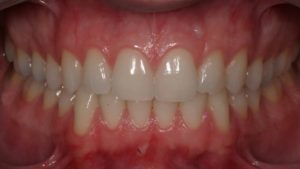
All right, guys, so we are going to explain to you how to take orthodontic pictures, which is very, very important. If you’ve ever worked with me before, you know I’m very, very specific about this. So thank you, Molina, for letting us take these pictures on you, and I’m going to show you guys right away.
Okay, so you won’t be able to see this, but there are basically two settings on the camera that we use. One is automatic or just has a green symbol over it, and the other one is ‚M‘ for manual or we sometimes call it ‚mouth.‘ So those are the two settings that we use.
Step number one, turn everything on, and then we’re going to take things. The three tools we’re going to be using are these cheek retractors. This one goes for the front of the mouth and the sides of the mouth, and then we’re going to use this guy along with the mirror for the tops and the bottoms.
So, I like to always have a specific order. I start with all the face or the front teeth or the front pictures and the side ones. But first, before you do anything, you don’t have her information pulled up obviously because she’s not a patient, but if she were, I would take a picture of her name first. That’s step number one because we’re going to have a lot of patients, and so the stuff gets kind of mixed up. If you take a picture of their name first, then this piece is more organized.
So I’d go click-click, take a picture of her name, and then we start using these guys. Whenever you’re doing this, it’s always weird at the start, but I like to talk to the patients through everything I’m doing, that includes taking pictures. If I was going to take X-rays, if I’m going to bond or band, I talk through everything. So the first thing is I’m going to say, „Hey, I’m going to put these inside your mouth. I’m going to spread them like this. If you open this a little bit, I’m going to have you tilt your head back just a little bit.“
One thing before I put them in there, you’re going to notice I’m going to take a step back with my mask. You’re going to notice patients, whenever they’re doing this, they want to go like „Ah,“ like crazy wide, and that sucks. That’s not good for us because everything’s super, super tight. So most of the time, they go like „Ah,“ and then I’ll say, „Okay, that’s cool, but just close it down just a little bit,“ and it makes life a lot easier. So that’s one of the tricks.
Around the back, have you open up a little bit, cool. Can you bite down? This is also important because when people bite down, when patients bite down, they tend to slide down like this. They want to touch. Everybody wants to touch their front teeth for some reason. I don’t know why. But you have to make sure that they’re biting down normally, and how we know that is probably 95% of the time, if they’re biting down normally, their back teeth are going to touch. So if they’re biting like this, their back teeth don’t touch, but they’re biting normally, their back teeth touch. That’s important because we don’t want pictures where their bite is off. That defeats the whole purpose of this.
So, try this again. Open up a little bit, cool, and then bite down. Perfect. Then when it’s looking good, I’m going to have the patient grab both sides of this, and then whenever they do, I say, „Hey, pull out like this,“ because that’s the easiest way to do it. Then I’m going to do M function (mouth function), manual function, whatever you want to say, but it’s M function. I’m going to turn on the flash, and then I want to be maybe like four and a half-ish away from the patient, and that just, for us, gets the best distance, gets the best pictures. Everything turns out the best. So, I’m going to start off by doing that.
So, most patients, Molina has done this before, so she knows what’s going on. But most patients won’t start by looking at you. Most of them will start looking forward. So, let’s say, pretend like you’re looking forward. Then, if I’m trying to take a picture, which I see 80% of the dental assistants trying to do this, instead of turning the patient, they’ll try to take the picture. So they’re literally going like this, trying to take a picture. That’s no good. We don’t want that. We want you to turn the patient towards you to make your life a lot easier, to make the pictures better, and to make it less awkward. So, that’s how we do it. I’m going to have you turn towards me a little bit.
Now she’s looking directly at me. This is really important. If I’m taking a picture, I’m to the side, your pictures are going to turn out bad. You want to make sure that you’re directly in line with them every time. If she’s, say, I take the picture and I’m like this, okay, everything’s pretty good. That turns out to be a good picture. If she’s turning her head down, I can either push her head back up, or I can go down and take the picture from here too. I want to look at the plane of her teeth. And this is always hard for me to explain to people, but the plane of her occlusion is basically how her head is tilted. So if her head is tilted down, her plane of occlusion is going to be down. That means I need to get the camera down, tilt your head up from it. So she tilts that a little more. She’s tilting it up. That means I have to also be up, or you can have them lift their face, but you always want to be on the same plane, same plane of occlusion as the patient.
Okay, so we’ve taken the front picture. Remember, we are on setting M, which I wasn’t, I was on the other side, but now where I am. And now we’re going to take the side pictures. Okay, same thing. She’s really easy to take these on because she’s done this before. If they weren’t good, I’d say keep holding this one, and I’m going to grab this one. So that’s what I do, and I’d say, „Hey, you can loosen the left side a little bit. I’m going to grab the right side.“ Then I’ll do the same thing, take the picture


