Welcome to the final episode of our photography series. In the previous episode, we delved into equipment and settings. In this video, I’ll be sharing my technique for capturing standard shots along with numerous tips to simplify the process.
By now, you should have the settings for both portraits and intra-oral shots established from the previous episode. Let’s start with portraits. Hang a black theater cloth or ask your nurse to hold a blackout blind behind the patient. Both you and the patient should be seated at eye level, approximately one and a half meters apart. Set your camera as previously determined and hold it in portrait mode. Instruct the patient to look straight into the lens and use autofocus for capturing the image.
Moving to intra-oral photographs, adjust your settings as per the earlier intra-oral ones and switch to manual focus. For basic intra-oral shots, set the focus ring to one to three, meaning you adjust your position for focus instead of the focus ring. This consistency helps maintain image size between before and after photos. Use a magnification ratio of one to three for basic intra-oral photos, and one to one point five for detailed shots. To prevent air bubbles, have the patient breathe in before capturing the image.
When taking portrait shots, position the patient and yourself comfortably. A key mistake is resting the patient’s head on the headrest, leading to an unnatural occlusal plane. Instruct the patient to tilt their head slightly and look straight at you, tilting their chin if necessary. Focus on the lateral incisors and capture the image as the patient smiles naturally. To enhance retraction, have the patient hold retractors gently, allowing them to gauge comfort and tension.
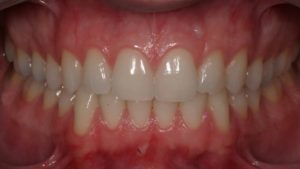
In the same seated position, instruct the patient to slightly open their mouth, capturing the upper anterior shots. For work on anterior teeth, consider using a contraster, ensuring proper positioning for effective contrast. Adjust your flash settings manually to avoid overexposure. For lateral views, guide the patient’s head tilt and retractor positioning to achieve proper occlusal plane representation. This consistency is key in maintaining accurate records.
When capturing posterior views, laying the patient flat at a low height is crucial. Ensure the patient tilts their chin upwards and opens wide. Use lip retractors to prevent occlusal surface obstruction. For occlusal shots, use mirrors for a clear view and focus on the first molar’s distal surface. Lower occlusal shots might necessitate tongue elevation for clear imaging. Transition to posterior quadrant photos using retractors and mirrors, keeping magnification ratio at 1 to 1.5.
Complete the process by thanking your patients for their patience and cooperation. This concludes our series; I hope you’ve found it helpful. If so, please consider liking and subscribing. If you’re interested in advanced dental photography, let us know in the comments. Thank you for watching and see you soon!


